
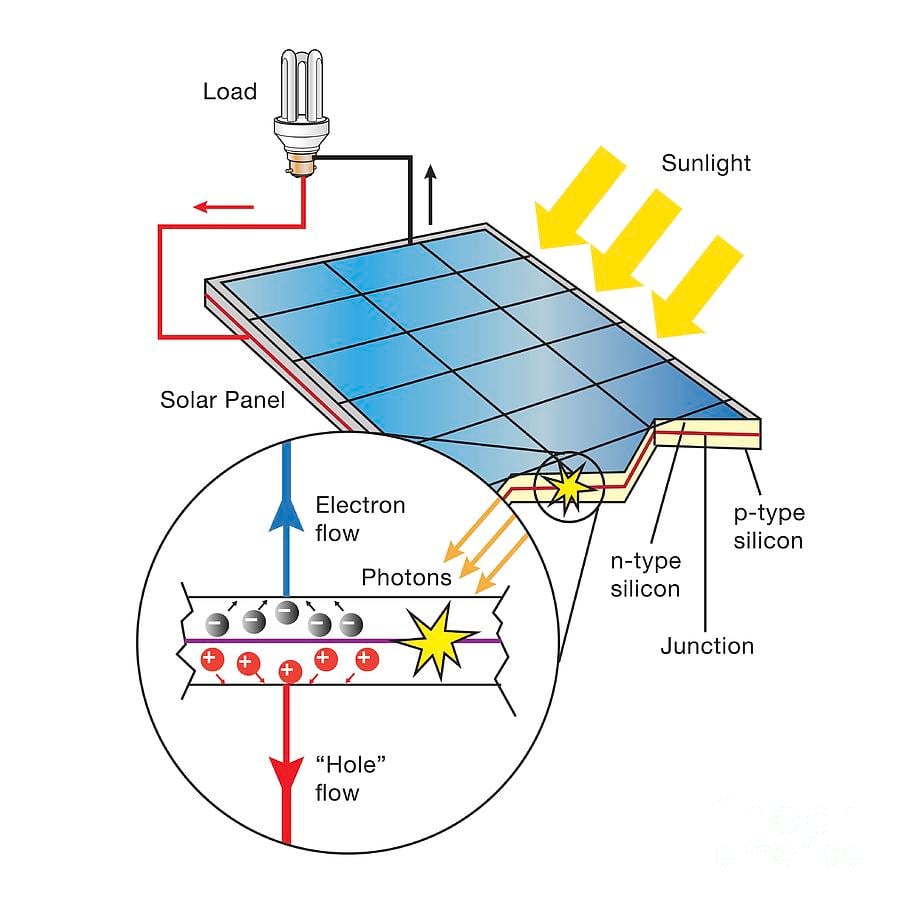
Photovoltaic panels, also known as solar panels, are a popular and environmentally friendly way to generate electricity. By harnessing the power of the sun, photovoltaic panels can provide clean and renewable energy for a variety of applications. If you’re interested in making your own photovoltaic panel, follow these steps to create your own solar power source.
Step 1: Gather Your Materials
The first step in making a photovoltaic panel is to gather all the necessary materials. You will need solar cells, which can be purchased from a variety of suppliers. Additionally, you will need a soldering iron, soldering wire, a flux pen, a tabbing wire, a bus wire, a plywood board, and a plexiglass sheet.Step 2: Prepare the Solar Cells
Next, you will need to prepare the solar cells for assembly. Start by cleaning the solar cells with a damp cloth to remove any dirt or debris. Then, use the flux pen to apply flux to the tabs on the front of each cell. After that, you will need to solder tabbing wire to the front of each cell to connect them in series.Step 2.1: Connect the Solar Cells
Once the tabbing wire is soldered to the front of each cell, you will need to connect the cells in series. This can be done by soldering the tabbing wire of one cell to the bus wire of the next cell, repeating this process for all the cells.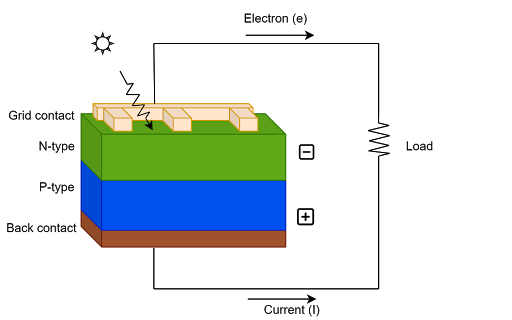
Step 2.2: Create the Panel Frame
After the cells are connected, you will need to create the panel frame. Start by cutting a piece of plywood to the size of the solar panel you want to make. Then, lay out the connected solar cells on the plywood board and use a strong adhesive to secure them in place. Finally, place the plexiglass sheet on top of the cells and secure it to the plywood board to complete the panel frame.Step 3: Test the Panel
Once the panel is assembled, it’s important to test it to ensure it is functioning properly. Use a multimeter to measure the voltage and current output of the panel to make sure it is generating electricity. If everything is working as expected, your photovoltaic panel is ready to use!Step 3.1: Install and Use the Panel
After testing the panel, you can install it in a sunny location and start using it to generate electricity. Whether you’re looking to power a small electronic device or an entire home, your homemade photovoltaic panel can provide clean and renewable energy for a variety of applications.By following these steps, you can create your own photovoltaic panel and harness the power of the sun to generate clean and renewable electricity. Making your own solar panel is not only a rewarding DIY project, but it can also help reduce your carbon footprint and reliance on traditional energy sources. So why not give it a try and start making your own solar power source today?
